WebGPU is a modern graphics API designed to provide high-performance graphics and computation capabilities across different platforms, including web browsers, desktops, and mobile devices. It is intended to be a successor to the WebGL API, offering more advanced features, better performance, and greater flexibility for developers.
It offers several advantages over the WebGL API:
Enforces the use of asynchronous calls for various operations, reducing bottlenecks on the main thread.
Introduces compute shaders (i.e., the ability to run computations on the GPU).
Allows rendering to multiple HTML canvas elements using only one WebGPU device.
…and GPU-Curtains
While working on my curtains.js WebGL library, I gained some basic knowledge of how a graphics rendering API worked under the hood. So, when the Chrome team announced that WebGPU would be available by default in April 2023, I immediately decided to see if I could port my code to WebGPU.
However, one thing that bothered me was that curtains.js was oriented toward rendering only planes and lacked a proper basic renderer that could handle any kind of geometry.
After a lot of hard work, I am proud to present GPU-Curtains, a small, lightweight WebGPU library.
Like curtains.js, its main purpose is to turn HTML elements into 3D meshes, but it can also be used as a fully-fledged 3D rendering engine!
Its high-level API is designed to let you focus on writing WGSL shader code while handling most of the WebGPU calls out of the box.
We are going to build a landing page containing 4 independent WebGPU scenes. Each scene will have its own HTML Canvas Element that we will use for rendering our objects.
Here is a brief overview of the various scenes and what you’ll learn:
Draw multiple meshes, position them so they always fit in the viewport, and add a basic Lambert shader.
Create a DOM-synced planes gallery and add a post-processing pass to distort them on scroll.
Load a glTF object, sync its size and position with an HTML element, add the ability to rotate it on drag, and change its base color when clicking on a set of buttons.
Create a particle system using instanced billboarded quads, use compute shaders to set and update the particles’ positions and velocities, and finally add shadows.
Scroll through and interact with the demos below to see what we’ll be creating in this 4‑part series…
Although these articles were written using the library v0.7.x versions and extensively explain how to add various lighting setups from scratch, a new library version (v0.8.x) has since been introduced with a built-in lighting system.
These articles remain relevant, as understanding how lights and shadow maps work under the hood is valuable knowledge for every 3D web developer. The repository, however, includes a dedicated branch that ports all the articles to the v0.8.x version. Don’t forget to run yarn install when using this branch.
The repository contains several branches corresponding to the tutorial steps. Each branch matches the final result of its associated chapter. For example, if you want to study the 5.2 Shaders chapter, you would need to switch to the previous branch 5-intro-5-1-adding-shading-uniforms.
So, begin by switching to the first branch 1-intro-1-setup and start the server:
git checkout 1-intro-1-setup
yarn dev
Before writing any code, let’s review two of the files located in the /js folder. Demo.js is the main class that manages all the scenes, and DemoScene.js is an abstract base class that all scenes will inherit.
As you can see, there are many unused methods in the code. They are included to help understand the lifecycle of each scene and to define a consistent global code pattern as we build them.
The addScrollTrigger(), removeScrollTrigger(), and onSceneVisibilityChanged(isVisible) methods will help manage when each scene enters or leaves the viewport using GSAP’s ScrollTrigger. Basic GSAP timelines will also be added when scenes enter the viewport inside addEnteringAnimation() and removed with removeEnteringAnimation().
For the WebGPU part, we will wrap the setup and destroy calls inside the respective initWebGPU() and removeWebGPU() methods. This way, we can check if the WebGPU device was successfully created using the isWebGPUActive getter to avoid errors if device creation fails.
Demo.js
// js/Demo.js
import { GPUCurtains } from 'gpu-curtains'
import Lenis from 'lenis'
import { gsap } from 'gsap'
import { ScrollTrigger } from 'gsap/ScrollTrigger'
export class Demo {
    constructor() {
        gsap.registerPlugin(ScrollTrigger)

        // Cap pixel ratio to improve performance
        this.pixelRatio = Math.min(1.5, window.devicePixelRatio)

        this.initLenis()

        this.gpuCurtains = new GPUCurtains({
            label: 'gpu-curtains demo',
            autoRender: false,
            watchScroll: false, // we'll use Lenis instead
            pixelRatio: this.pixelRatio,
        })

        // Needed to create the renderers
        this.deviceManager = this.gpuCurtains.deviceManager

        this.scenes = []

        this.createScenes()

        this.initWebGPU()

        gsap.ticker.add(this.render.bind(this))

        gsap.ticker.lagSmoothing(0)
    }

    initLenis() {
        this.lenis = new Lenis()
        this.lenis.on('scroll', ScrollTrigger.update)
    }

    async initWebGPU() {
        try {
            await this.gpuCurtains.setDevice()
        } catch (e) {
            // WebGPU is not supported
            const disclaimer = document.createElement('div')
            disclaimer.setAttribute('id', 'no-webgpu-disclaimer')
            disclaimer.classList.add('tiny')
            disclaimer.innerText = 'Unfortunately, it looks like WebGPU is not (yet) supported by your browser or OS.'
            document.body.appendChild(disclaimer)
            document.body.classList.add('no-webgpu')
        }

        this.scenes.forEach((scene) => scene.initWebGPU())

        this.gpuCurtains.onRender(() => {
            this.scenes.forEach((scene) => scene.shouldRender && scene.onRender())
        })
    }

    render(time) {
        this.lenis.raf(time * 1000)
        this.gpuCurtains.render()
    }

    createScenes() {
        // Create scenes here
        this.lenis.on('scroll', (e) => {
            this.gpuCurtains.updateScrollValues({
                x: 0,
                y: e.scroll
            })

            this.scenes.forEach((scene) => scene.onScroll(e.velocity))
        })
    }

    destroyScenes() {
        this.scenes.forEach((scene) => scene.destroy())
    }

    destroy() {
        this.destroyScenes()
        this.gpuCurtains.destroy()
    }
}
There’s nothing particularly complex here. Note that WebGPU device creation is asynchronous, and it’s wrapped in a try...catch block to avoid breaking the code if the creation fails. We’ll also keep track of the scenes in an array and call various DemoScene methods.
We use the awesome Lenis library to smooth scrolling and hook gpu-curtains scroll updates to it.
We are going to create the intro scene. Create a new IntroScene.js file in the /js/intro-scene folder as follows:
// js/intro-scene/IntroScene.js
import { BoxGeometry, Mesh } from 'gpu-curtains';
import { ScrollTrigger } from 'gsap/ScrollTrigger';
import { DemoScene } from '../DemoScene';
export class IntroScene extends DemoScene {
    constructor({ renderer, nbMeshes = 500 }) {
        super({ renderer });
        this.nbMeshes = nbMeshes;
    }

    init() {
        this.section = document.querySelector('#intro-scene');

        // Default camera position is (0, 0, 10)
        this.renderer.camera.position.z = 80;

        this.meshes = [];

        super.init();
    }

    setupWebGPU() {
        this.createMeshes();
    }

    destroyWebGPU() {
        this.meshes.forEach((mesh) => mesh.remove());
    }

    addScrollTrigger() {
        this.scrollTrigger = ScrollTrigger.create({
            trigger: this.renderer.domElement.element,
            onToggle: ({ isActive }) => {
                this.onSceneVisibilityChanged(isActive);
            },
        });

        this.onSceneVisibilityChanged(this.scrollTrigger.isActive);
    }

    removeScrollTrigger() {
        this.scrollTrigger.kill();
    }

    onSceneVisibilityChanged(isVisible) {
        if (isVisible) {
            this.section.classList.add('is-visible');
            this.renderer.shouldRenderScene = true;
        } else {
            this.section.classList.remove('is-visible');
            this.renderer.shouldRenderScene = false;
        }
    }

    createMeshes() {
        const boxGeometry = new BoxGeometry();

        for (let i = 0; i < this.nbMeshes; i++) {
            const mesh = new Mesh(this.renderer, {
                label: \`Cube ${i}\`,
                geometry: boxGeometry,
            });

            // Set a random initial rotation
            mesh.rotation.set(Math.random(), Math.random(), Math.random());

            // Set a random initial position (remember 80 is the camera's Z position)
            mesh.position.x = Math.random() * 80 - 40;
            mesh.position.y = Math.random() * 80 - 40;
            mesh.position.z = (Math.random() - 0.5) * 80;

            this.meshes.push(mesh);
        }
    }
}
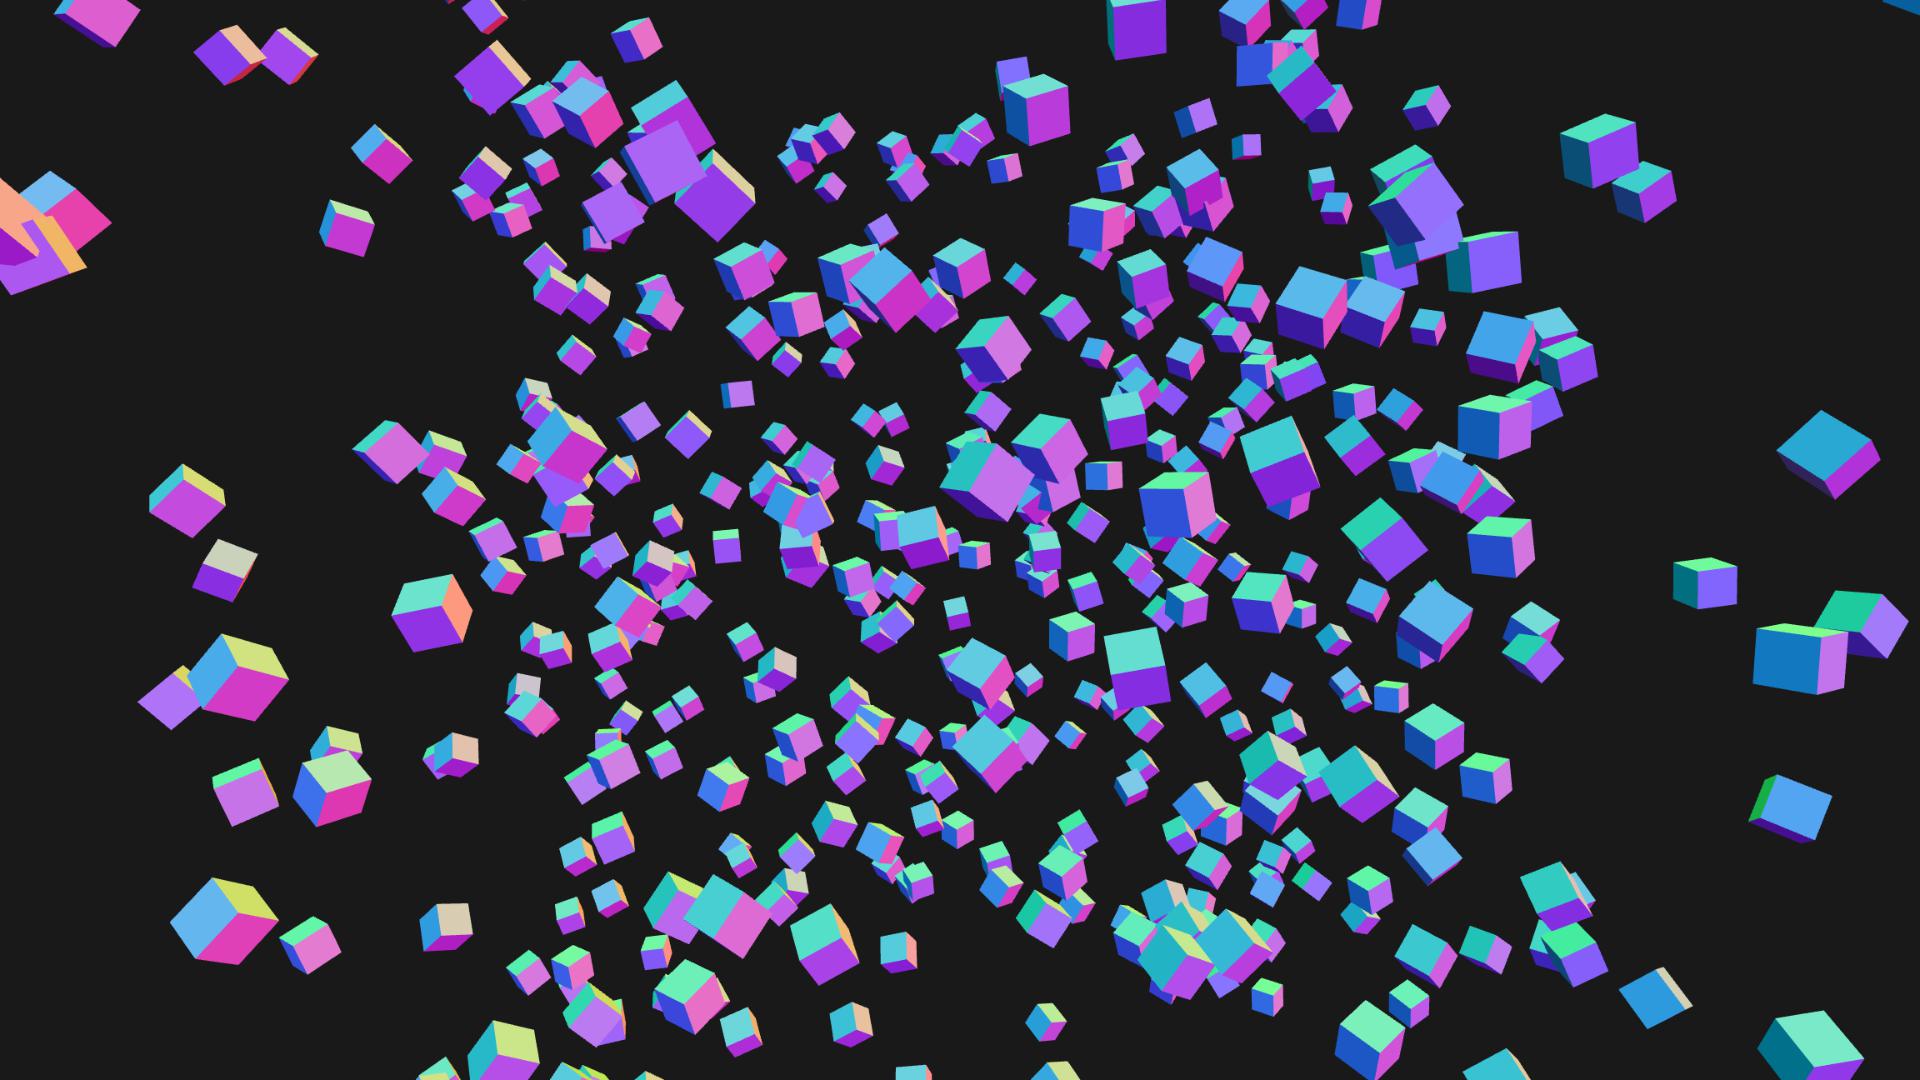
This code adds 500 randomly positioned and rotated cubes to the renderer scene and renders them. Notice that we update the renderer camera object position, which we will explain below.
To create a Mesh, we must pass the renderer as the first parameter. The second parameter defines the mesh geometry and material options.
We reuse the same boxGeometry for all meshes to avoid recomputing geometry attributes and buffers for each mesh. We also add a label parameter, which is a common practice in WebGPU. Whenever an error is thrown by the WebGPU API, the label of the associated resource is included in the error message.
For now, we don’t need any additional parameters. Since no shaders have been passed, the library defaults to a fragment shader displaying the mesh’s normals, which is perfectly fine for quick prototyping.
Tip! We will pause the rendering whenever the renderer’s DOM element leaves the viewport to improve performance.
Now, let’s go back to Demo.js and add the scene:
// js/Demo.js
import { GPUCurtains, GPUCameraRenderer } from 'gpu-curtains';
import Lenis from 'lenis';
import { gsap } from 'gsap';
import { ScrollTrigger } from 'gsap/ScrollTrigger';
import { IntroScene } from './intro-scene/IntroScene';
Note: From now on, we won’t include code blocks for each new file import. Your IDE should handle that automatically.
We’re creating a GPUCameraRenderer instance to manage the scene. This renderer internally creates a perspective camera used to project the meshes. We need to pass the deviceManager from the GPUCurtains instance and a container (either a selector or an HTML element) into which the actual HTML Canvas element will be appended.
If everything goes well (and it should!), you should now have a scene that looks like this:
That’s great. However, the first thing we notice is that by randomly placing the meshes into our scene, some are obviously positioned outside the area covered by our canvas (or, more specifically, the camera frustum). That’s a shame.
Fortunately, the camera has a convenient method to get the world’s visible size at any given depth using its width, height, and field of view. This means that if we position a mesh inside those boundaries, it will always lie inside the camera frustum. Since these boundaries change on resize, we’ll need to handle that as well. Here’s how we’d do it:
// js/intro-scene/IntroScene.js
createMeshes() {
    // Now add meshes to our scene
    const boxGeometry = new BoxGeometry();

    for (let i = 0; i < this.nbMeshes; i++) {
        const mesh = new Mesh(this.renderer, {
            label: `Cube ${i}`,
            geometry: boxGeometry,
            frustumCulling: false,
        });

        // Set a random initial rotation
        mesh.rotation.set(Math.random(), Math.random(), Math.random());

        // A random depth position based on the camera's position along the Z axis
        const zPosition = (Math.random() - 0.5) * this.renderer.camera.position.z;

        const setMeshPosition = (zPosition) => {
            // Get the visible width and height in world units at the given depth
            const visibleSize = this.renderer.camera.getVisibleSizeAtDepth(zPosition);

            mesh.position.set(
                visibleSize.width * (Math.random() * 0.5) * Math.sign(Math.random() - 0.5),
                visibleSize.height * (Math.random() * 0.5) * Math.sign(Math.random() - 0.5),
                zPosition
            );
        };

        // Updates the position right away AND after resize
        setMeshPosition(zPosition);

        mesh.onAfterResize(() => {
            setMeshPosition(zPosition);
        });

        this.meshes.push(mesh);
    }
}
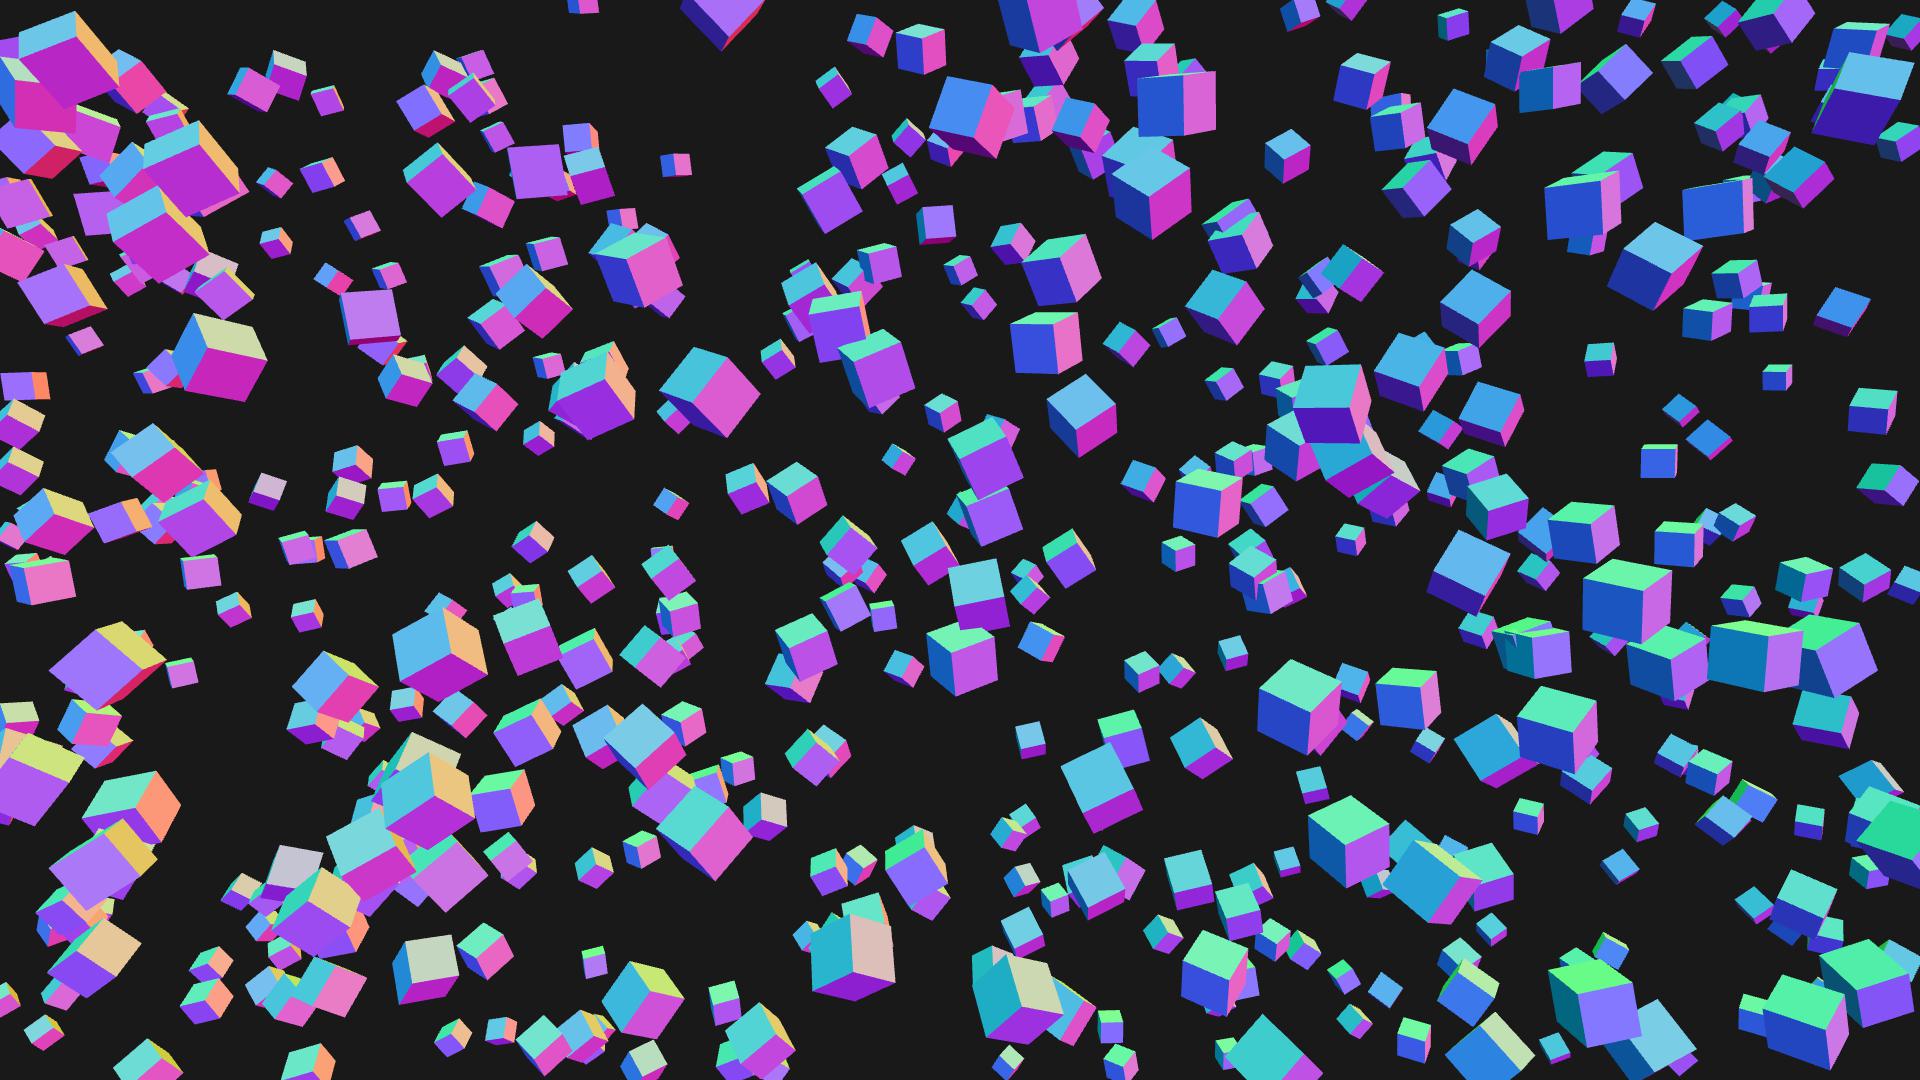
The meshes’ positions should be much better now! You can even try to resize your window and see how the positions are updated to always fit within the canvas.
Tip! Since we know the meshes will always be drawn inside the camera frustum, we can disable frustum culling to improve performance by adding frustumCulling: false when creating the meshes.
Next, we can add an entering animation: each time our onSceneVisibilityChanged is called and isVisible is true, we can tween the meshes’ positions from the center of our scene to their end positions.
First, we’re adding a GSAP timeline that is restarted every time our scene enters the viewport. This timeline tweens a meshesPositionProgress value from 0 to 1.
Next, we modify our createMeshes method a bit so that instead of directly updating our meshes’ positions, we store the current and end positions in two Vec3 vectors.
Finally, we use those two vectors in our onRender method (called at each GSAP tick) to update each mesh’s position and rotation, and we’re done!
The scene is starting to take shape, but we’d definitely like to add a proper shading to the meshes now. We’ll do this by using a custom fragment shader and some uniforms.
The fragment shader will use lambert shading, so we’ll have to define an ambient light and a directional light.
Note: Curtains v0.7.7 lacked built-in classes for managing lights, but v0.8 has introduced them! Since these tutorials were created with v0.7.7, we’ll guide you through handling lights manually.
First, let’s add a light position vector for our directional light:
// js/intro-scene/IntroScene.js
init() {
    this.section = document.querySelector('#intro-scene');

    // Default camera position is (0, 0, 10)
    this.renderer.camera.position.z = 80;

    // Feel free to tweak the light position and see the effect
    this.lightPosition = new Vec3(50, 20, 100);

    this.meshes = [];

    super.init();
}
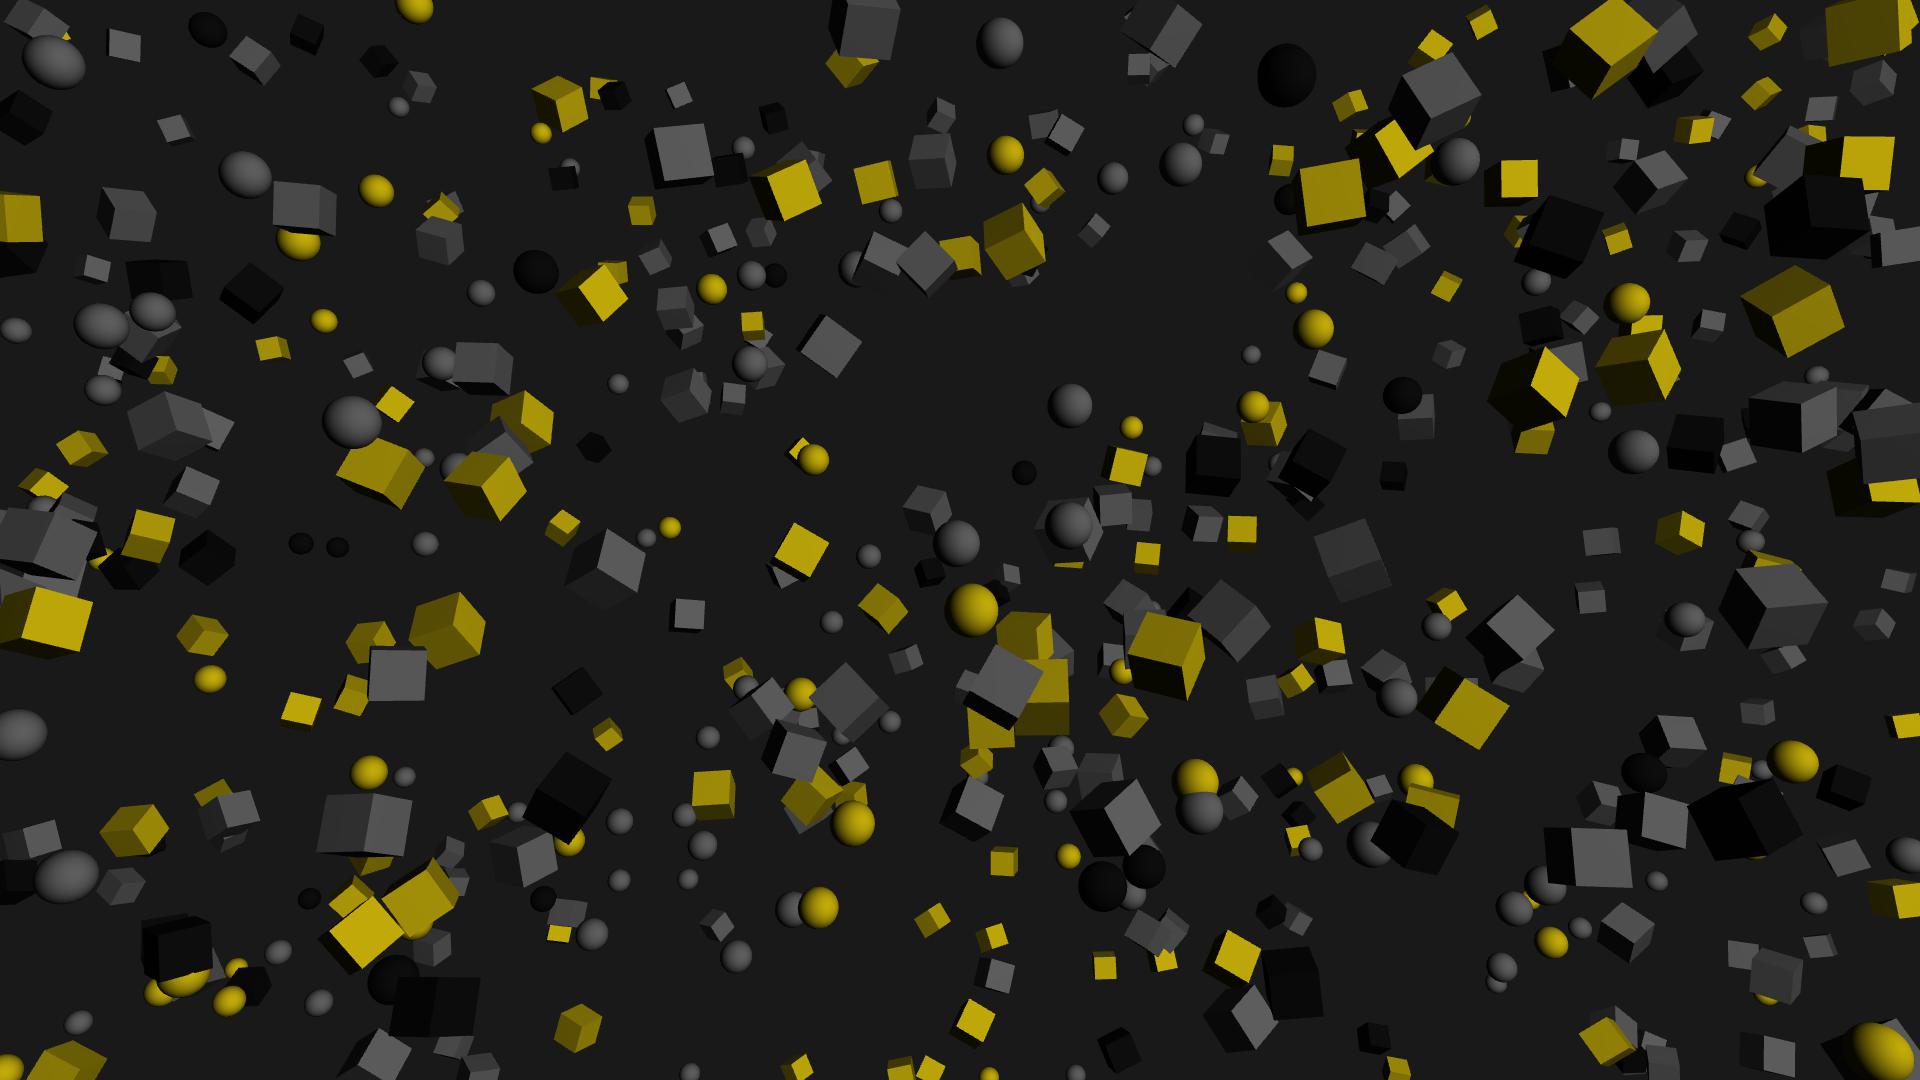
Next, we add the uniforms and geometries to our meshes. We’ll assign either a BoxGeometry or SphereGeometry, add an opacity uniform, randomly choose between three predefined colors, and pass the lighting parameters.
// js/intro-scene/IntroScene.js
createMeshes() {
    const boxGeometry = new BoxGeometry();
    const sphereGeometry = new SphereGeometry();
    const grey = new Vec3(0.35);
    const gold = new Vec3(184 / 255, 162 / 255, 9 / 255);
    const dark = new Vec3(0.05);

    for (let i = 0; i < this.nbMeshes; i++) {
        const random = Math.random();
        const meshColor = random < 0.5 ? grey : random > 0.85 ? dark : gold;
        const mesh = new Mesh(this.renderer, {
            label: `Cube ${i}`,
            geometry: Math.random() > 0.33 ? boxGeometry : sphereGeometry,
            uniforms: {
                ambientLight: {
                    visibility: ['fragment'],
                    struct: {
                        color: { type: 'vec3f', value: new Vec3(1) },
                        intensity: { type: 'f32', value: 0.05 }
                    }
                },
                directionalLight: {
                    visibility: ['fragment'],
                    struct: {
                        position: { type: 'vec3f', value: this.lightPosition },
                        intensity: { type: 'f32', value: 1 },
                        color: { type: 'vec3f', value: new Vec3(1) }
                    }
                },
                shading: {
                    visibility: ['fragment'],
                    struct: {
                        color: { type: 'vec3f', value: meshColor },
                        opacity: { type: 'f32', value: 1 }
                    }
                }
            }
        });

        // Set a random initial rotation
        mesh.rotation.set(Math.random(), Math.random(), Math.random());

        // Set a random depth position based on the camera position along the Z axis
        const zPosition = (Math.random() - 0.5) * this.renderer.camera.position.z;

        // Store current and end positions
        mesh.userData.currentPosition = new Vec3();
        mesh.userData.endPosition = new Vec3();

        const setMeshEndPosition = (zPosition) => {
            const visibleSize = this.renderer.camera.getVisibleSizeAtDepth(zPosition);
            mesh.userData.endPosition.set(
                visibleSize.width * (Math.random() * 0.5) * Math.sign(Math.random() - 0.5),
                visibleSize.height * (Math.random() * 0.5) * Math.sign(Math.random() - 0.5),
                zPosition
            );
        };

        // Update positions right away and after resize
        setMeshEndPosition(zPosition);

        mesh.onAfterResize(() => setMeshEndPosition(zPosition));

        this.meshes.push(mesh);
    }
}
For those familiar with libraries like Three.js, the uniforms object structure might seem a bit different. For instance, take the directionalLight uniform:
The visibility property indicates in which shader the uniform can be used. Since we’ll use it only in the fragment shader, we set it to ['fragment']. If we wanted to use it in the vertex shader as well, we could set it to ['vertex', 'fragment'] (or omit it, as it’s the default option).
The struct property refers to how the uniforms are structured and bound to the shaders. In WGSL, this is similar to C structure syntax:
Each uniform creates an ArrayBuffer that packs the corresponding data before sending it to a GPUBuffer. These buffers are then added to a GPUBindGroup, allowing us to use them inside shaders:
let directionalLightIntensity: f32 = directionalLight.intensity;
At this point, we have added the uniforms, but if you look at the result, you’ll still see the basic normal shading applied. That’s because we haven’t added any custom shaders yet!
WebGPU uses a new shading language called WGSL. If you’re familiar with GLSL, WGSL should be relatively easy to understand, even though the syntax differs slightly. I recommend exploring resources like Tour of WGSL before diving in.
Before writing our shaders, let’s examine how gpu-curtains automatically adds bindings to them and displays a mesh with normal shading by default.
The mesh material class provides two useful methods for debugging our shaders: getAddedShaderCode() and getShaderCode().
Note: These methods need the shaders to be compiled before returning anything useful. They should, therefore, be used inside the mesh onReady() callback.
First, let’s inspect the WGSL code that gets added to our shaders. Add the following code after the new Mesh() call inside the createMeshes() method:
// js/intro-scene/IntroScene.js
// We don't want to log this for every 500 meshes!
if (i === 0) {
    mesh.onReady(() => {
        console.log(
            '// >>> VERTEX SHADER ADDED CODE\n\n',
            mesh.material.getAddedShaderCode('vertex'),
            '\n\n// >>> FRAGMENT SHADER ADDED CODE\n\n',
            mesh.material.getAddedShaderCode('fragment')
        );
    });
}
When you check the console, this is the output you’ll get:
As you can see, the vertex shader uses the geometry attributes along with the camera and matrices uniforms. Functions like getOutputPosition() and getWorldNormal() help calculate the mesh position and pass UV and normals to the fragment shader. The fragment shader outputs the normalized fsInput.normal.
We are now ready to write our shaders!
Remove the getShaderCode() log, create a file named intro-meshes.wgsl.js in the /js/shaders directory, and paste the following shaders:
// js/shaders/intro-meshes.wgsl.js
export const introMeshVs = /* wgsl */ `
struct VSOutput {
    @builtin(position) position: vec4f,
    @location(0) normal: vec3f,
    @location(1) worldPosition: vec3f,
};
@vertex fn main(attributes: Attributes) -> VSOutput {
    var vsOutput: VSOutput;

    // Position in world space
    let worldPosition: vec4f = matrices.model * vec4(attributes.position, 1.0);

    // Outputted position
    vsOutput.position = camera.projection * camera.view * worldPosition;

    // Normals in world space
    vsOutput.normal = getWorldNormal(attributes.normal);

    // Will be used in our fragment shader to calculate lighting in world space
    vsOutput.worldPosition = worldPosition.xyz;

    return vsOutput;
}
`;
export const introMeshFs = /* wgsl */ `
struct VSOutput {
    @builtin(position) position: vec4f,
    @location(0) normal: vec3f,
    @location(1) worldPosition: vec3f,
};
@fragment fn main(fsInput: VSOutput) -> @location(0) vec4f {
    // Color and opacity from our uniforms
    var color: vec4f = vec4(shading.color, shading.opacity);

    // Ambient light
    let ambient: vec3f = ambientLight.intensity * ambientLight.color;

    // Diffuse Lambert shading
    let N = normalize(fsInput.normal);
    let L = normalize(directionalLight.position - fsInput.worldPosition);
    let NDotL = max(dot(N, L), 0.0);

    let diffuse: vec3f = NDotL * directionalLight.color * directionalLight.intensity;

    // Apply ambient + diffuse and simulate alpha blending
    color = vec4(color.rgb * (diffuse + ambient) * color.a, color.a);

    // Display our color
    return color;
}
`;
Now, add the shaders to our mesh parameters, and we’re done!
We’re almost done! We just need to add a few tweaks to our entering animation timeline to properly display the text content, and we’ll be finished.
We’ll add a basic fade-in animation for the text, and reduce the directional light intensity slightly once everything is displayed to create better visual contrast.
The opacity will be based on the animations.meshesPositionProgress value each frame. This ensures that the opacity will always match the mesh position animation.
We’ve learned how to create meshes, position them randomly, pass uniforms to shaders, update them, and even wrote our own Lambert shading!
In a real-world scenario, we wouldn’t draw 500 meshes like this, as it’s not very performant. We would likely use instancing instead. Additionally, all the light uniforms could be stored in a single shared buffer. But we’ll cover those topics in future articles in this series!